Showing posts with label gimp girl. Show all posts

2.16.2012

gimp girl tutorial: rounded photo corners

Happy Thursday, lovely Marigoldlets! 
Here's a simple way to add vintage flair to your photos: round the corners.
Takes less than 30 seconds, once you get the gist.
Ready, go.

{new to gimp? it's like photoshop, only free. start here and here.}

First, open an image using Gimp.


Next, Select > Rounded Rectangle.


The Rounded Rectangle dialogue box will appear.
You can play with the radius percentage {how curvy your curve will be}. 
I set mine to 25%.


After hitting OK, you'll notice that part of your image {the larger part} is selected.
We want to get rid of those tiny triangles in the corners, so we'll invert the selection.
So, Select > Invert.


Edit > Clear and say goodbye to those triangles.


Now Select > None...


...now you're ready to add some deco tape and call it a day.


{you know the only reason I do this is to subject you to otherwise irrelevant but crazy cute pictures of my offspring... right?}

8.30.2011

gimp girl tutorial: make + share simple wall art

I am loving your comments + emails about the last tutorial + ideas about what you'd like to learn, so keep it coming, ok?

Today's tutorial was inspired by Rachel of Maybe Matilda, who wanted to know how to add a background design to words.


I love art that has good words.
For this project, I've chosen a refrain from the beloved hymn, Count Your Blessings.
{I've been loving this bluegrass version -- it's at the bottom of the page.}

In this Gimp tutorial, you will learn how to:

Create a hi-res image suitable for printing
Add a background design as a new layer
Add text
Download + use special fonts 
Change text font, size, and color
Upload to a file sharing site
Create a "click to download" link for your blog

{Just joining us? Start here!}

Let's roll. 

Since we plan to print the image, we need to start with a high resolution.
Open Gimp and go to File > New.


Because we'll be printing the artwork, we'll set the resolution to 360 ppi (pixels per inch).
That way, the image will be nice and crisp when you print it.
When you're making an image for web display only, 72 ppi is all you need.
If you were to print out a 72 ppi image, it would look blurry.


Now you're ready to open your background pattern. 
Go to File > Open as Layers
and choose a pattern from your clip art stash.
I'm using some tasty chevron wallpaper from Erin Bradley Designs.


Opening the wallpaper as a layer accomplishes 2 things:
1) It opens a copy of the wallpaper directly into your image-in-process so that you don't have to mess with copying + pasting.
2) Since it's a copy, the original file remains unaltered.

Once your wallpaper is open, go to Image > Fit Canvas to Layers.
This makes your workspace and your wallpaper the same size.

Now we're ready to add text.

First, select the text tool.
Second, double-click-hold-drag on your image to create a text box 
(you can change its size and location later if you need to).
Third, type text into the Text Editor window.


You'll probably see right away that the text is teeeeeny tiny! 


Before we make it bigger, let's change the font.
In the Toolbox, click on Font and select a font from the drop-down menu.
I'm using Vive la Rivoluzione, one of my faves.
That font doesn't come with Gimp; you'll need to download and install it separately. 
After downloading the font of your choice, add it to your computer's font library.
You'll need to save your work + restart Gimp in order to use your new font.


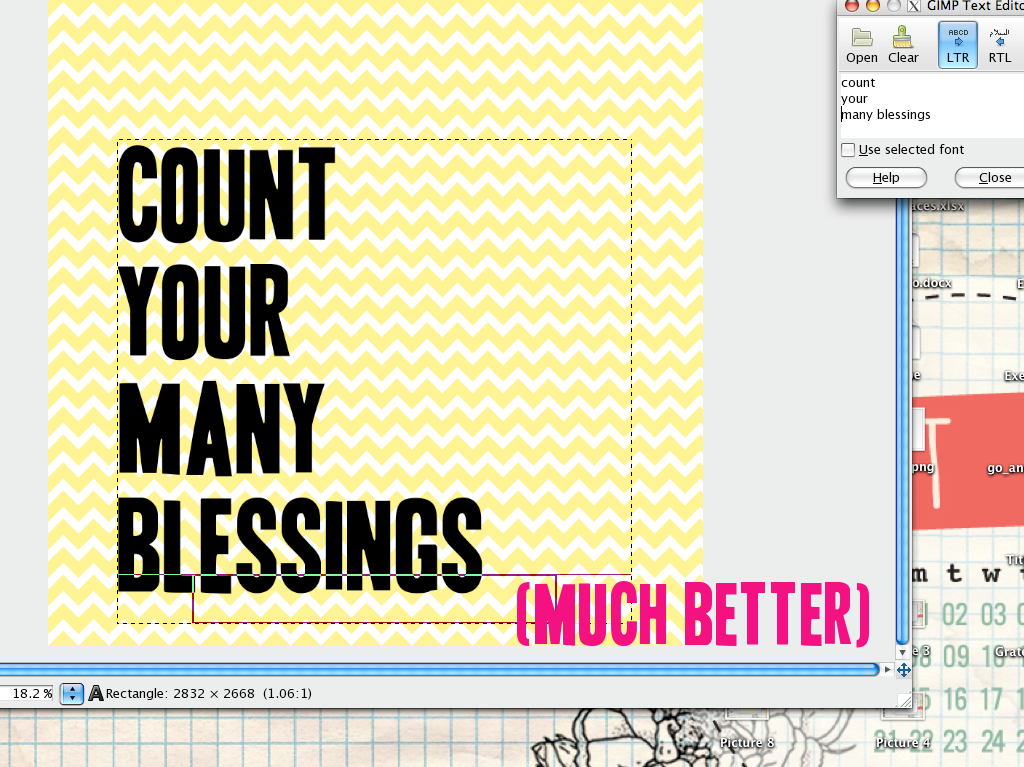
Let's change the text size.
Click the up or down arrows next to Size in the Toolbox.
You can also play with the justification; I'm going to make my text right-justified.


The text is now larger than the size of the text box. 
To fix that, hover your cursor over the edge of the text box. 
Drag the edge down until all of the text is visible.


Now for my favorite part. Time to change the text color!

Double-click the rectangular box underneath the Text menu in the Toolbox. 
A separate Text Color window will pop up.


I'm feelin' a minty aqua for my text color today.
First, click on a spot on the vertical color spectrum bar that you like the look of.
Don't be shy! You're not painting the Taj Mahal.


Next, drag the crosshairs in the square color box on the left. Watch the color in the Current box (bottom left) until you see a color you like. Click OK.


Now we'll reposition the text.
Select the move tool.
Double-click and drag the text until you've got it where you want it.


All done! Save your work (I like to save one as an .xcf file and another copy as a .jpg).

Now we'll upload your new work of art to a file sharing site.
I've been using Sendspace. It's simple. No frills.

Upload the file. When it's done, you'll see this screen giving you a few different links to choose from.
Click on the second link ("Download Link").


Next screen. 
See the blue box towards the bottom that says "Click here to start download"?
Right-click that box and select Copy Link.


Now head over to Blogger (or your blog host of choice).
Just one step left: time to make the download link.

In my blog post, I've entered the text "Click here to download the print."
Highlight the word "here" and make a link. 
When it asks for the link URL, right-click and hit Paste.
When your readers click on the word "here," your print will automatically download to 
their computer -- without sending them away to a 3rd-party site. Win!


All done! You've got a kick-trash print, and you can share it, too!


{Click here to download the print!}


Sources:
Chevron wallpaper via Erin Bradley Designs
Chalkboard via Kitschy Digitals
Fonts: Cursive Standard, Impact LabelVive la Rivoluzione

8.10.2011

gimp girl tutorial: adding deco tape to photos for your blog

{Pssst! I'm giving away this tasty stack of washi later this week!}

Are you ready to get your Gimp on?? I sure hope so.
'Cause today we're gonna learn how to apply digital deco tape to an image using the program Gimp. 

Gimp is a FREE program that's comparable to Photoshop (we don'need no steenking photoshop!), and you can download it here for PC or here for Mac.

I have yet to find a really great comprehensive source of Gimp tutorials, but so far I've been able to figure most stuff out with Google + a whole lot of trial and error. The more I experiment with the program and with its different tools, the more proficient I feel.
I think that the best way to learn is to DO, so let's dive in & get DOING!

In the course of this tutorial, you'll learn how to:

Use the rectangle select tool
Copy + paste
Work with layers
Scale images
Rotate images
Autocrop images

Easy, peasy, lemon squeezy. Let's rock it.

To get going, open Gimp.

See the very tippy top of the screen, where it has the Apple menu and X11 and Applications and everything? Ignore that.
You'll only use the menu you see at the top of the blank gray box.


Next, we'll open the main image you want to work with.

Go to File > Open, 
find the photo you want to work with {in my case, the washi pic}, and open that bad boy up.

Here's what we have so far.


Now we'll whip out the washi. A karate chop with your non-mouse hand is encouraged but not required.

Go to File > Open,
find your fave deco tape file (I strongly recommend the freebies at Pugly Pixel; that's what I use 99% of the time), and open.

Time to select the piece of tape you want to use.

In the Toolbox at the left of the screen, double-click on the rectangle select tool.
Move to your deco tape window and click + hold + drag the mouse over the piece of tape you like best.


Now we'll copy and paste that piece of tape into your main image.

In the deco tape window, go to Edit > Copy.
In the main image (in my case, the deco tape photo), go to Edit > Paste as > New Layer.
Yay!


Notice a few things:
The deco tape is huge as compared to the photo. We'll resize that in a sec.
See the Layers window in the upper left hand corner? We've got 2 layers right now: the tape and the photo.
Each layer can be edited and manipulated separately. If I mess around with one layer, it won't affect the other layer(s).
More on that another time.

Time to resize the tape.
You can close the deco tape file now if you wanna.
Look at the Layers window and make sure the tape layer is selected.
{If you want to resize the photo instead, knock yourself out; just select the layer with the photo in it.}

In the Toolbox, double-click on the scale image tool.
As you hold down the control key, click + hold + drag the mouse until the tape is the size you want it.
Holding down the control key preserves the length/width ratio of the image.
As you do this, a Scale window will pop up (mine is at the bottom of the screen).
Hit return OR click Scale in the Scale window.
See? You've got options.


Almost there!
Let's rotate the tape.
I mean, of course you can leave it as it is. Or you can get sexy with it. Your call.

In the Toolbox, double-click on the rotate image tool.
Click + hold + drag the mouse until the tape looks nice to you.
As you do this, a Rotate window will pop up (mine is at the bottom of the screen).
Hit return OR click Rotate in the Rotate window.


Now we'll fit the canvas to our layers. 
See how my deco tape looks like it's been cut off at the top?


No bueno. To fix it, go to Image > Fit Canvas to Layers. 
Poof! It fits.

Now we'll prepare the image for posting on the web. This is easy.

To flatten the image (i.e. convert it from an image with layers to just an image, no layers), go to Image > Flatten Image.
Now autocrop the image to get rid of any unnecessary margins.
Go to Image > Autocrop Image.


Ahh, pretty.

This is optional, but I like to do it -- let's scale the entire image to an optimum size for your blog.
Go to Image > Scale Image.
Enter your desired pixel width, press the tab key, and hit Scale.
For this step, it's handy to know how wide your main blog column is {the place where your posts go}. Mine is fairly wide at 850px.
Depending on the effect I'm going for, I scale my images to between 600-800px wide.

DONE!

Lastly, save your image. If you don't add a file type to the end of the file name, Gimp will save the file as an .xcf file, which means that when you open it again later, it will open up as a Gimp file with all your layers preserved and everything. 

If you want your image to be a .jpg file so that you can upload it to your blog, just type .jpg at the end of the file name.


I usually save 2 copies of my images -- one as a .xcf and one as a .jpg.

After you hit Save, some more dialogue boxes will pop up. 
First one: hit Export.
Second one: slide the ticker to 100 and hit Save.

YOU DID IT!!

Now go slap some deco tape on all your fave photos.
Let me know if you end up using this -- I would really really love to see what you come up with!

I know it looks like a long tutorial, but once you get the hang of it, you'll be able to deco-tape your pics in 3 minutes flat. For serious.

We've got lots more to learn, so get practicing {cracks the whip}.
Let me know if you think of something you'd like to learn! I don't know everything (ha), but I'm always looking for ideas.

*kissy kissy!!*